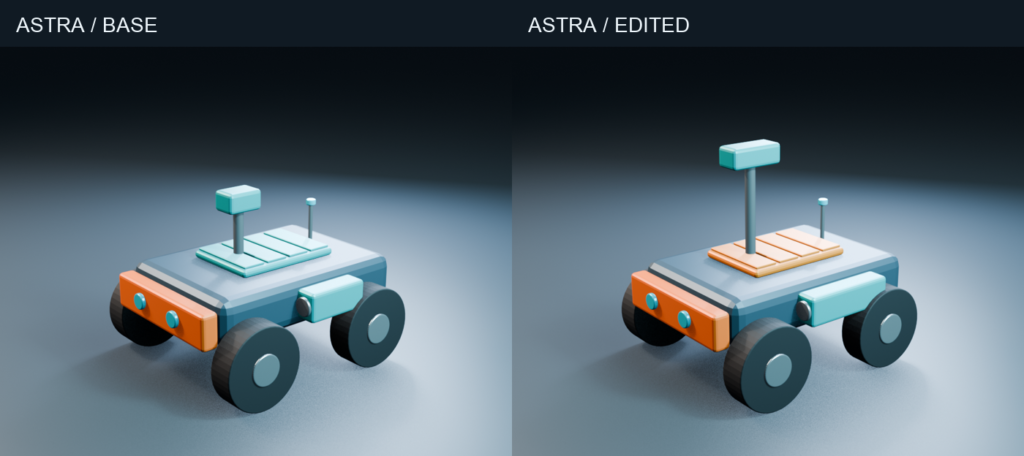
A drawing is a better starting point than a single photo when editability matters
The fastest way to get a usable 3D asset is not always to chase a perfect render. It is to create a scene whose parts can still be selected, measured, recoloured, replaced and exported after the first pass.
For this test, GPT-6 Astra worked from an original three-view drawing of a fictional compact survey rover, then used local Blender Python to build a structured 3D scene. The result is a real Blender model with named parts, two editable .blend files, two GLB exports and a downloadable starter package.
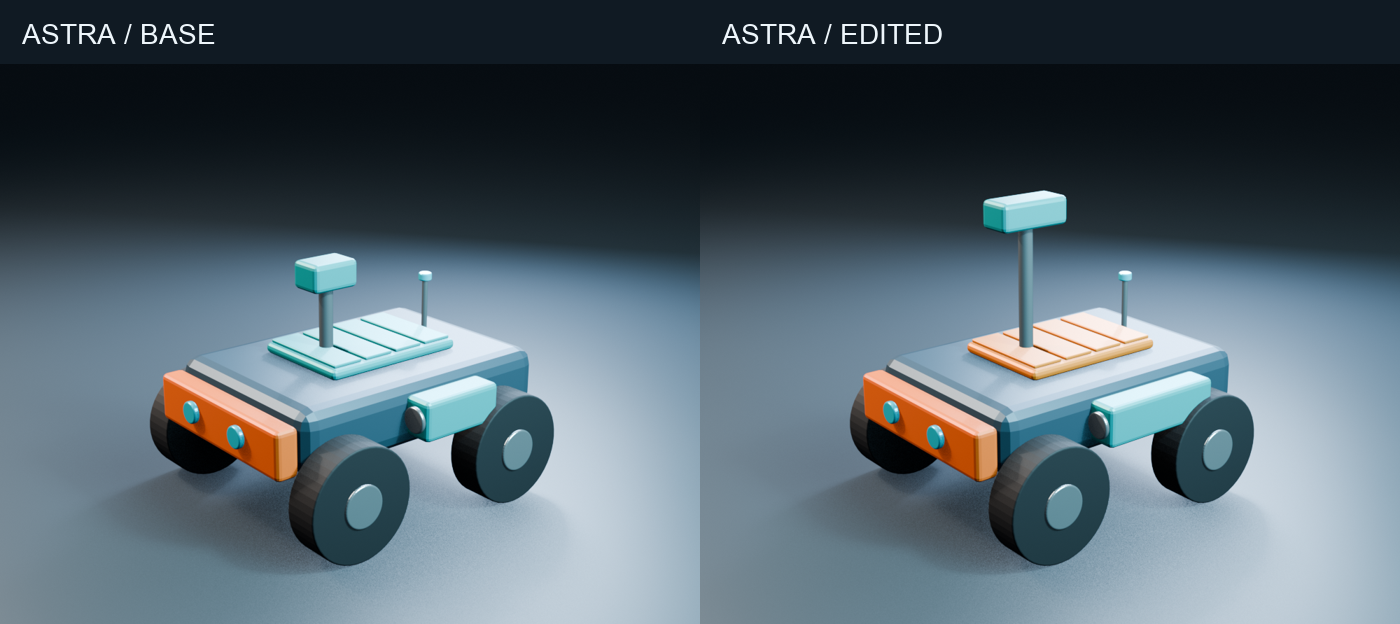
The point of the test was practical: can a clean reference drawing become an asset that survives a meaningful revision? The answer is yes for this kind of hard-surface concept, provided the brief includes dimensions, separate parts and a verification step.
Watch the Blender verification replay
The model is more useful when readers can inspect how the files behave rather than taking a still image on trust. The short inspection reel moves through five actual Blender camera angles for the base scene and the saved-base edit. The longer walkthrough shows the original reference, actual local Blender UI captures, measured changes, the exact prompts, and the corrections made after reviewing the earlier baseline.
Footage disclosure: These are local Blender verification replays of the saved scenes and renders. They are not footage of the original GPT-6 Astra session.
What we made
The Fieldnote R1 is an original rover design created for this article. The drawing supplies a graphite body, orange front bumper, roof panel, four wheels, cameras, a mast and a side sample pod. It also supplies the dimensions that matter most to the test: a 1.60 m overall body envelope, 1.05 m body width and 1.40 m outer tyre span.
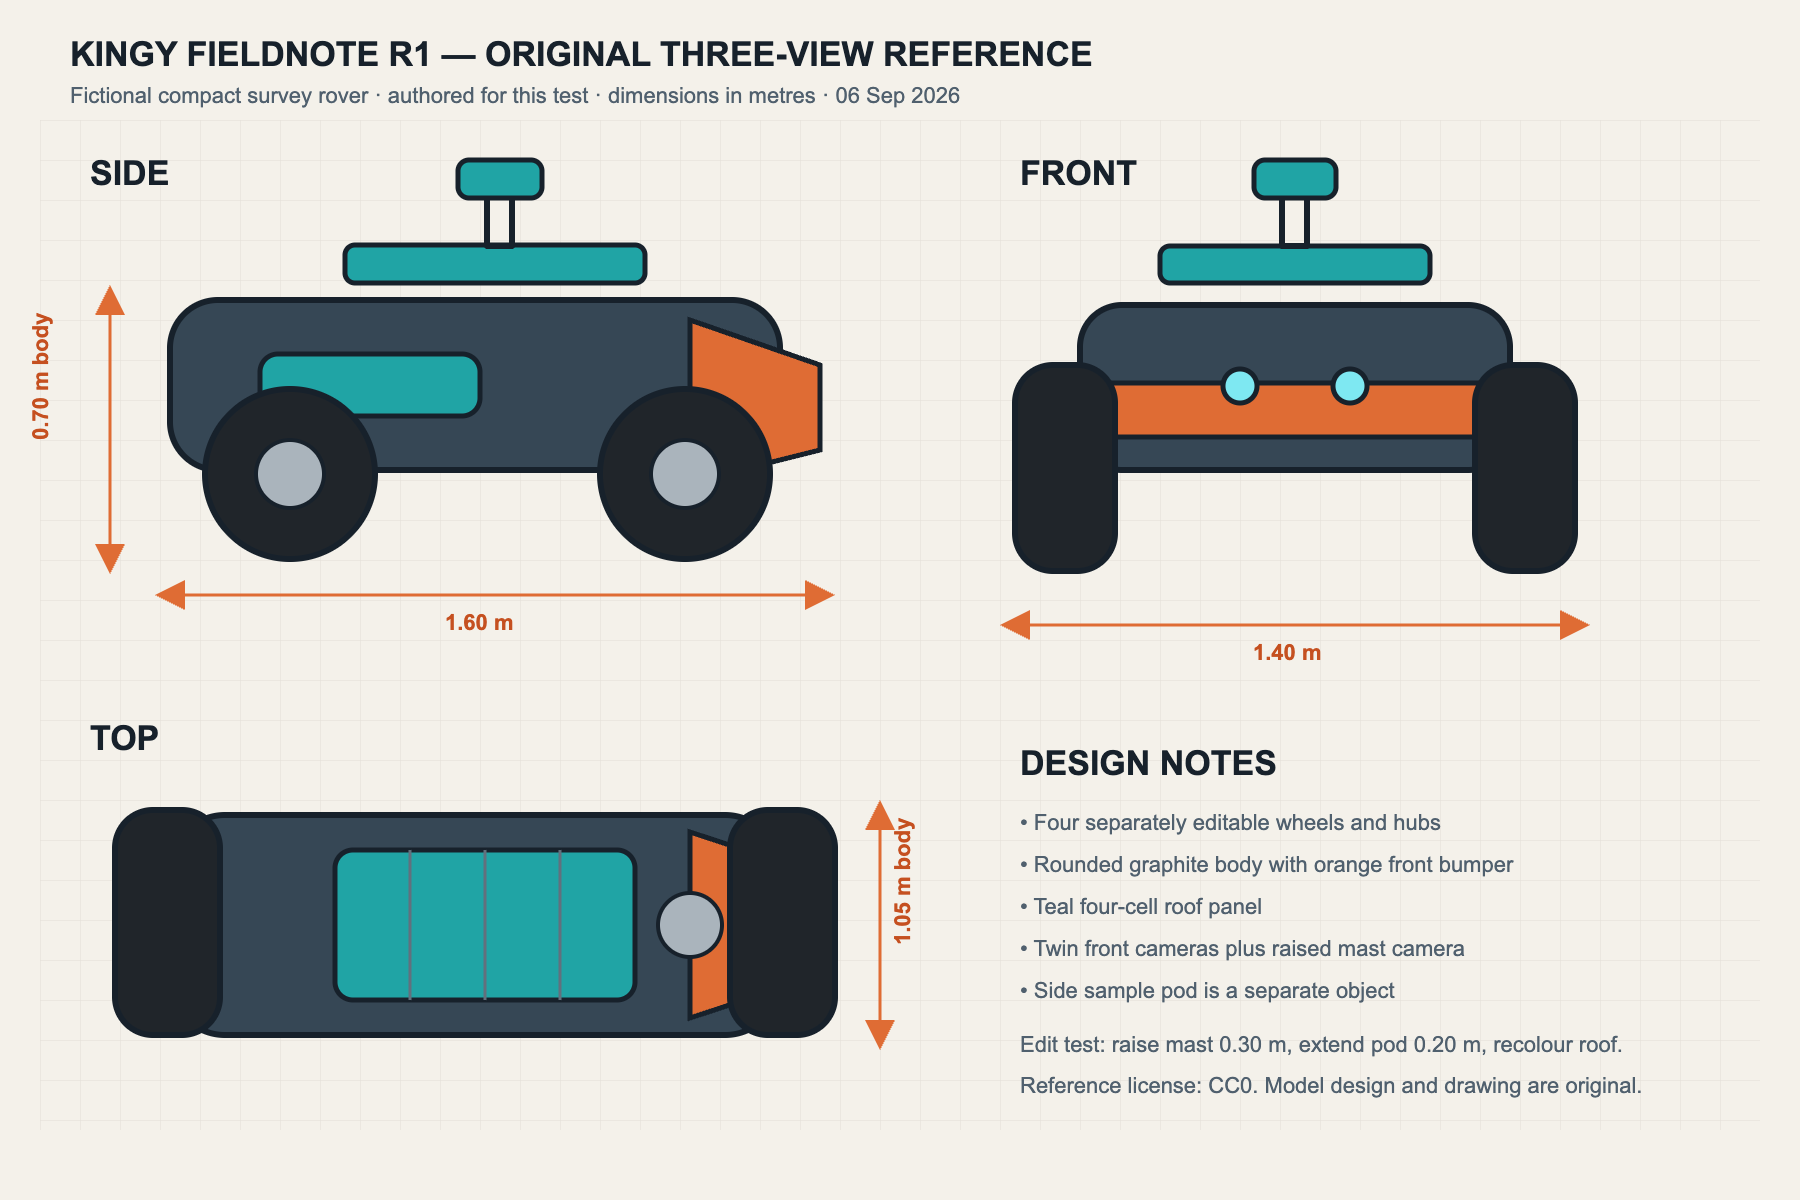
The reference is deliberately simple. It is a concept sheet, not CAD. Its rear and underside are unspecified; its views are not perfectly consistent; and a note that looks like a body-height label runs from the ground to the body top. Those are normal gaps in early-stage design material. The model uses the written dimensions as the source of truth and treats the remaining details as designed interpretation.
That distinction is the whole lesson. A 3D result can be useful and editable without being an exact reconstruction. If a project needs engineering accuracy, scanning accuracy, manufacturable tolerances or an exact product likeness, it needs more source material and specialist review.
What Astra did in Blender
The local test used GPT-6 Astra with Blender 5.2.1 LTS. Astra authored the scene-building instructions and Blender created the mesh, materials, native files, GLB exports and rendered views. No external 3D generator or downloaded model was used.
The native base scene contains 28 rover mesh objects, excluding lights, cameras and the studio floor. The body, bumper, four wheels, four hubs, axles, roof cells, cameras, mast, sensor head, sample pod, antenna and status light remain separate named objects. That structure is why the model can be revised without starting over.
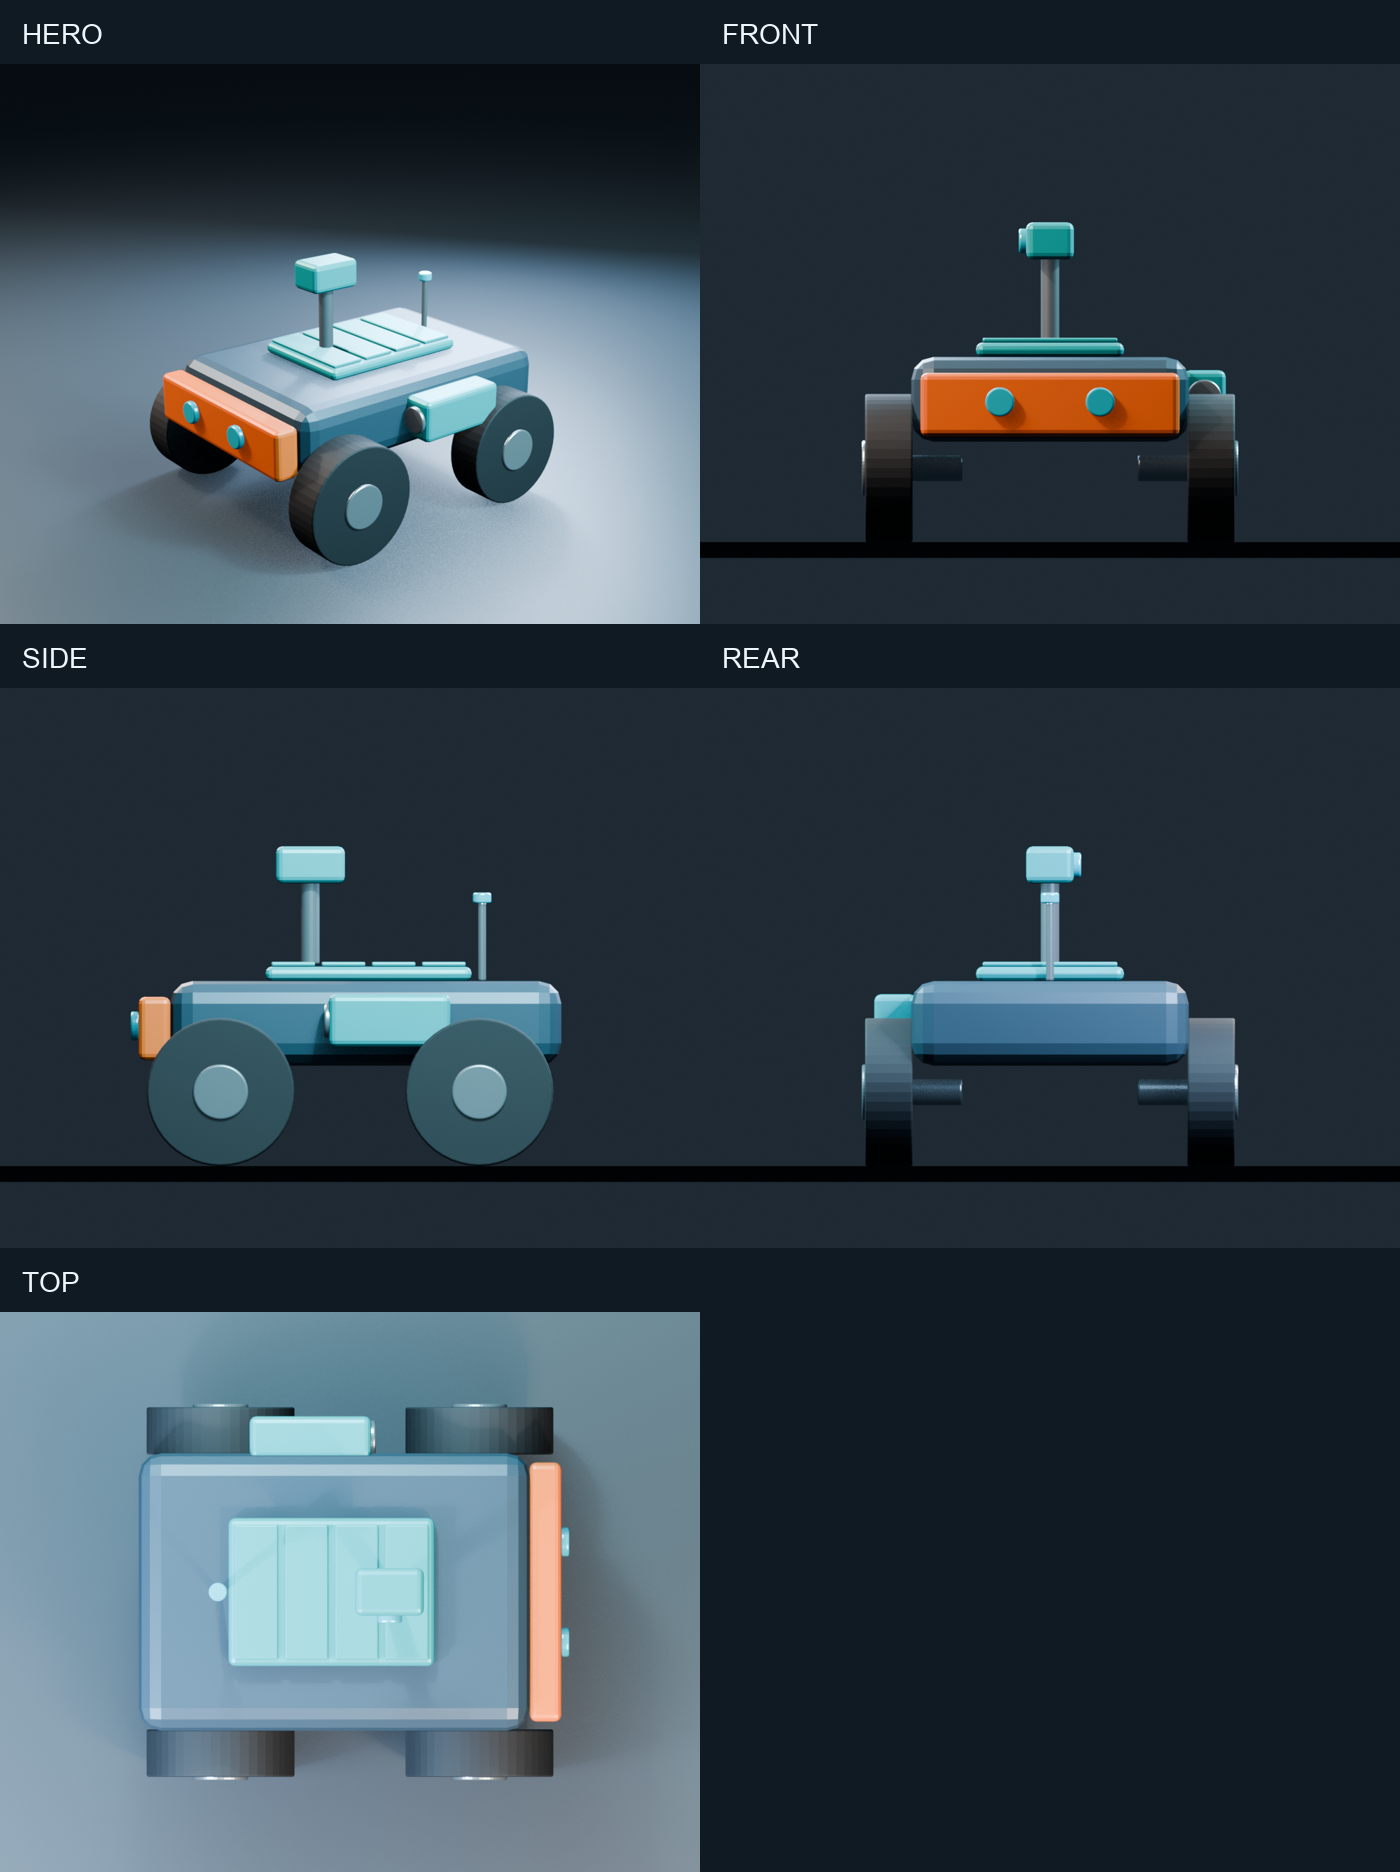
The first render is intentionally stylized. It uses rounded primitive forms and procedural materials, which makes it suitable for a product concept, game-prop blockout, motion-graphics asset or a starting point for a 3D artist. It is not a scan, a finished manufacturing model, a rigged character or a ready-to-print mesh.
How the test was run
This was a guided reproduction, not a blind benchmark. An original three-view drawing supplied written dimensions and named parts. The stored run metadata for the continuation identifies gpt-6-astra with medium reasoning. Blender 5.2.1 LTS built, stored and rendered the scene locally. The native base scene contains 28 rover mesh objects, excluding lights, cameras and the studio floor.
The verification step matters. We reopened both native .blend files, checked names, mesh data, locations, dimensions and materials, and then re-imported both GLB files into blank Blender scenes. All 28 checks passed. This proves the supplied files are structured enough for the stated edit test; it does not prove a blind comparison, manufacturing accuracy, printability, or performance in every downstream engine.
The edit test: did the scene remain editable?
The second instruction asked for four specific changes:
- Raise the sensor mast by exactly 0.30 m.
- Widen the mast camera head by exactly 0.12 m.
- Extend the side sample pod by exactly 0.20 m.
- Change the roof from teal to orange.
The edited result was made by reopening the saved base .blend, then changing the requested geometry and dependent attachments. The edit file stores a hash of the exact base file it started from. That is more meaningful than generating two separate scenes that merely look different.
| Measurement | Base | Edited | Change |
|---|---|---|---|
| Mast column height | 0.36 m | 0.66 m | +0.30 m |
| Mast-head width | 0.26 m | 0.38 m | +0.12 m |
| Mast-head centre height | 1.14 m | 1.44 m | +0.30 m |
| Sample-pod length | 0.46 m | 0.66 m | +0.20 m |
| Rover mesh objects | 28 | 28 | unchanged |
| Independent wheels | 4 | 4 | unchanged |
The mast retains its base position while it grows. The camera head and lens move upward together. The pod grows and its cap remains attached. Only the roof assembly takes on the orange material; the mast head and sample pod stay teal.
We verified those results by reopening both native Blender scenes and comparing object names, dimensions, locations, mesh data and materials. All 28 checks passed. Both GLB files then re-imported into blank Blender scenes with the complete expected set of named parts.
What the earlier baseline got wrong
The earlier baseline is useful because it makes the quality bar concrete. Its body width was 0.86 m rather than the drawing’s stated 1.05 m, and its outer tyre span was 1.34 m rather than 1.40 m. Its edited scene came from an alternate build branch rather than reopening the saved base file. A shared teal material also recoloured the mast head and sample pod when only the roof was meant to change. The corrected reproduction matches the written body width and tyre span, stores the base-file hash in the edit, gives the roof an independent material, and keeps a usable hero camera plus four orthographic inspection views.
These are corrections to a prior baseline, not evidence of a blind model comparison.
Why the files matter more than screenshots
A still image can make an asset look convincing while hiding a merged mesh, wrong scale, lost parts or a failed export. This package includes the things that reveal whether the workflow is useful:
fieldnote_r1_base.blendandfieldnote_r1_edited.blendare the editable master scenes.fieldnote_r1_base.glbandfieldnote_r1_edited.glbare portable geometry exports.- The original SVG reference drawing is released under CC0.
- Blender build, edit and verification scripts show how the scenes were produced and checked.
- Rendered base and edited views make the changes easy to inspect.
The download is designed as a starter project. Open the base scene, select Mast_Head or Sample_Pod in Blender’s Outliner, and compare its dimensions with the edited version. Use the GLB when you need a lightweight handoff. Keep the .blend as the master when you need Blender-specific materials, object names and modifiers.
Drawing versus photo
This article tests a drawing, not photo reconstruction. That is intentional.
| Input | What it is good for | Main limitation |
|---|---|---|
| Three-view drawing | Concepts, props and hard-surface objects | Missing construction detail |
| Single drawing | Fast blockouts and stylized scenes | Depth must be inferred |
| Single photo | Recognizable approximations | Perspective, scale and hidden surfaces |
| Multi-view photos | Better proportion and material cues | Framing and lighting can disagree |
| Photogrammetry set | Capturing visible surface detail | Topology still needs cleanup |
A clear drawing gives the model a starting geometry and a vocabulary of parts. A photo adds material cues, but it also hides surfaces and mixes perspective with scale. For a photo-first workflow, provide several angles, a known dimension, a scale object and written notes about anything that is not visible.
Limits to keep in mind
This workflow makes a structured first model, not a guarantee of production readiness.
The rover has no UV texture set, rig, collision mesh, manufacturing tolerance, printability validation or deformation-ready topology. The drawing does not resolve the underside, rear construction or precise bevel specification. The GLB re-import test proves basic portability in Blender; it does not prove that every game engine or web viewer will render the materials identically.
The model also benefited from a written brief. “Make it look right” is a much weaker instruction than “keep four wheels independent, use a 1.40 m outer tyre span, preserve the base scene, then extend this named pod by 0.20 m.” The more the required output matters, the more the input should specify measurements, part separation and the acceptance checks.
A practical prompt pattern
For a new concept, begin with a short request like this:
Use the attached reference and its written dimensions to build an editable Blender interpretation. Keep the body, wheels, hubs, roof panel, cameras, mast and accessories as separately named objects. Use metric units. Save a base
.blend, export a GLB and render several views. Before editing, reopen the saved base file. Then make the requested dimensional changes and report the measured before-and-after values.
Add the parts that matter to your project. If something can be selected separately, it can be changed separately. If you need a precise part later, name it now.
What this shows about Astra and Blender
OpenAI documents GPT-6 Astra as a model that can work with images, code and computer-use workflows. In a Blender workflow, the model reasons about the reference and authoring steps; Blender creates and saves the 3D scene. OpenAI’s GPT-6 Astra model page describes the model’s current capabilities, while Blender’s Python API and glTF exporter provide the implementation layer.
The useful combination is not a magic “image in, finished asset out” button. It is a faster route from a concept to a scene that can be inspected, corrected and handed to someone else.
For the broader setup, read our complete Blender + OpenAI Astra guide.
Exact reproduction prompts
The full prompts below are also included in the starter package. Record the model from run settings before attributing any result to Astra.
Build prompt
Use the attached original three-view reference of the fictional Fieldnote R1 survey rover. In Blender, create an editable low-poly interpretation at the stated dimensions. Keep the body, bumper, roof cells, four wheels, four hubs, axles, front cameras, mast, camera head, sample pod, antenna, and status light as separately named objects. Use procedural materials. Save an editable
.blend, export a.glb, and render hero, front, side, rear, and top views. Do not use external 3D-generation services or downloaded models. Record Blender version, object count, dimensions, and the exact model identifier shown in the run settings. If the run settings do not showgpt-6-astra, do not attribute the output to Astra.
Edit prompt
Starting from the base Fieldnote R1 Blender file, raise the sensor mast by exactly 0.30 m, widen the mast camera head by exactly 0.12 m, extend the side sample pod by exactly 0.20 m, and change the roof panel material from teal to orange. Preserve separate objects and all other dimensions. Save a new
.blend, export a new.glb, render the same five camera angles, and report the measured before/after dimensions.
Verification prompt
Inspect both Blender files rather than relying on screenshots. Confirm that each has four independent wheel objects and at least 20 independently editable mesh objects. Measure the mast height, mast-head width, and sample-pod length in both files. Confirm the source-reference filename and model-attribution status stored in the scene custom properties. Report failures explicitly.
FAQ
Can GPT-6 Astra make a Blender file from a drawing?
It can help interpret the drawing and create or revise Blender instructions and Python. Blender is the application that creates and saves the mesh. The result here is an editable Blender scene, not an image pretending to be one.
Is the download free to use?
The original drawing and renders are released under CC0. The included scripts are MIT licensed. The Fieldnote R1 name is fictional and can be replaced in your own project.
Can I use a photo instead?
You can, but a single photo leaves scale, depth and hidden surfaces unresolved. Use several original views and measured dimensions when accuracy matters.
Is this model ready for 3D printing or a game engine?
Treat it as a starting asset. Printability, collision, UVs, rigs, texture baking and engine-specific behaviour need their own checks.
Was a separate paid 3D generation service used?
No. The model was built, edited, rendered and verified locally in Blender. Access to GPT-6 Astra is separate from any claim about a 3D generator.
The Kingy Brief
Get The Kingy Brief.
AI changes, original tests and one practical thing to try. Fridays at 09:00 Vancouver time.
Free · Double opt-in · Unsubscribe anytime
Sign up for The Kingy Brief on Beehiiv.
Signup help and newsletter schedule
Signup form provided by Beehiiv. After submitting, check your inbox for "Confirm your subscription to The Kingy Brief" and open its confirmation link. Check Spam or Promotions if you cannot find it.
Fridays at 09:00 Vancouver time: source-checked AI changes, original tests and one practical thing to try. We skip a week when there is not enough verified material. Free. Unsubscribe anytime.