Astra becomes useful for music when you give it an idea worth developing and an editable way to express it. That might mean a melody as MIDI, a sequencer written in code, an arrangement inside Ableton Live, or a production brief for an audio-generation service. The exciting part is the amount of musical detail you can specify—and then revise.
This guide takes that approach from the first motif to the final export. Ableton Live is the main production environment. Strudel provides a browser route, and REAPER, Sonic Pi, Logic Pro, FL Studio, Bitwig, Basic Pitch and Suno offer other useful ways to work. You will find production prompts, a complete Strudel example, a downloadable original MIDI composition and a practical method for improving a piece without losing its identity.
What we checked: Sources were checked on September 7, 2026. We generated and structurally validated the accompanying MIDI and synthesized audio examples, and executed the Strudel example in a browser. The Ableton and other DAW walkthroughs are documented production recipes; we did not run a complete Ableton or Suno session for this article. Audio-file validation does not establish artistic quality. The featured artwork is an AI-generated editorial illustration, not a software screenshot.
Start here: hear the sketch, then make it yours
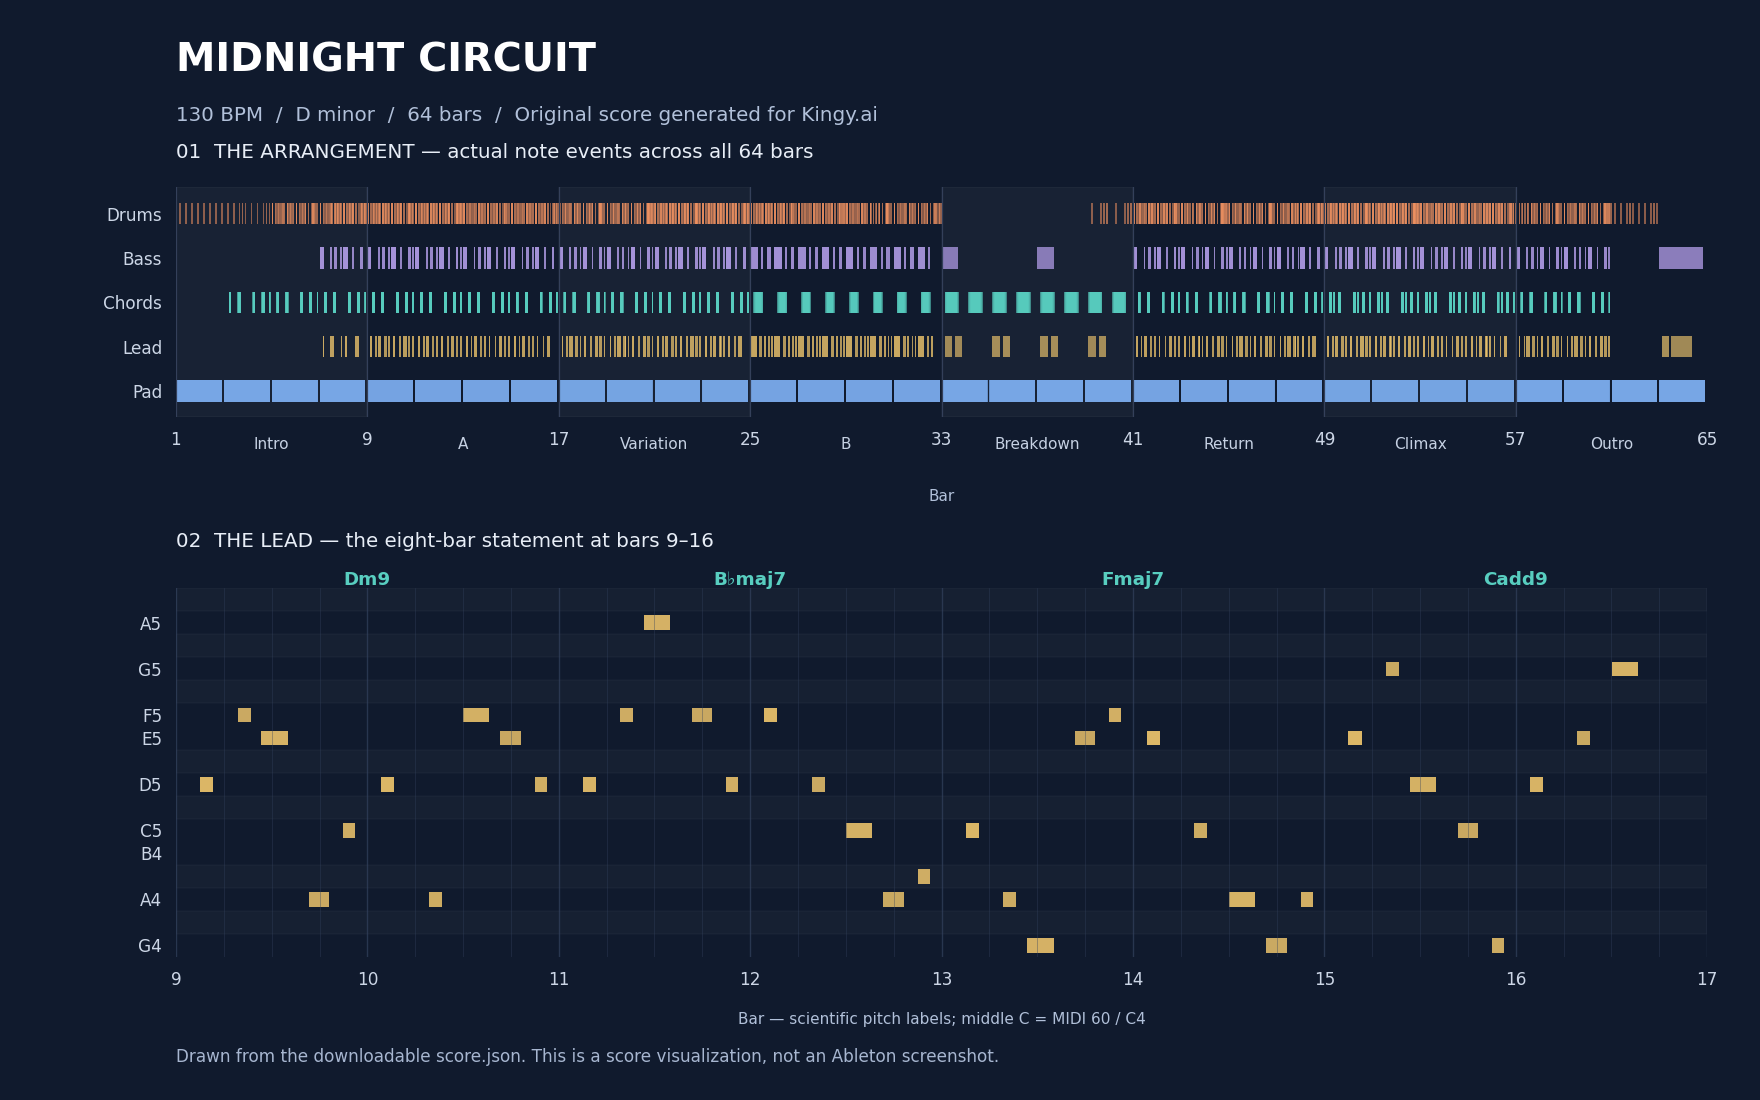
Our original example is Midnight Circuit, a 64-bar melodic UK garage sketch at 130 BPM in D minor. It has five musical parts, an eight-section arrangement and a deliberate ending. The download includes a combined MIDI file, separate MIDI parts, the generator source, a score in JSON, and basic-versus-revised comparison material.
Listen: Midnight Circuit — full 64-bar sketch
Download the MIDI, WAV and source-code bundle (20.6 MB ZIP)
Compare the basic and revised 16-bar arrangements
A — basic, straight arrangement
B — revised groove and arrangement
The original WAVs use the same synthesis engine and RMS target. Several musical choices change together; this is not a controlled comparison of models or reasoning modes.
The reference audio uses a small software synthesizer created for the example. It gives you a way to hear the notes and form without owning Ableton. The Live recipe later in the guide uses stock instruments to reinterpret those same notes. Expect different timbres: a MIDI file stores a performance, not the sound of the instrument that played it.
If you want the shortest useful route, download the files, open a new Ableton Set at 130 BPM, and import the five MIDI parts at bar 1. Load a populated Drum Rack on Drums and match its pads to the supplied MIDI note map; load Drift on the other tracks. Play through once before changing anything. Then pick one problem: perhaps the hook needs a clearer answer, the bass holds too long, or the return needs a stronger contrast. Give Astra that exact problem and ask it to preserve the parts you already like.
A DAW, or digital audio workstation, is the program where you record, arrange and mix. MIDI is a stream of note and performance instructions. A stem is an exported audio part, such as drums or vocals. A motif is a short idea that the listener can recognize when it returns. Those four concepts are enough to begin.
The viral Ableton clip needs its punchline
The starting point for this article was Timour Kosters’ post, which presents a request for GPT-6 Astra to use Ableton and make a banger. Adam Neely’s quoted reaction helped draw attention to it. But the author later asked for a usage reset for a “successful rickroll”.
That clarification changes how the clip should be cited. A visible DAW arrangement, a familiar tune and an enthusiastic reaction do not establish how an original composition was made. We inspected the posts and the author’s reply; we did not independently reconstruct the session or establish the source of every sound in its video.
The interesting production questions survive the joke. Can an agent express a harmonic plan as editable notes? Can it make a bass part leave space for the kick? Can it develop a recognizable theme across several sections? Can it preserve your strongest idea during a revision? Those are questions a downloadable score and a reproducible workflow can help answer.
Use the online examples later in this guide as leads with clear labels. A creator’s report is valuable, but it is different evidence from a session you have reproduced. A human live-coding performance is useful inspiration without becoming an Astra demonstration merely because it appears in an AI article.
What GPT-6 Astra contributes to a music session
OpenAI lists GPT-6 Astra as a reasoning model with text and image input and text output, plus support for tools including coding, computer use and MCP. The model endpoint is not itself listed as an audio-output model. A host application can give it additional tools, but access depends on what that application actually exposes. Official Astra model page
In practice, separate three contributions. First, Astra can specify the music: notes, harmony, rhythm, structure and performance instructions. Second, it can write code or operate an available tool to turn that plan into something editable. Third, an instrument, DAW or audio-generation system produces the sound. You supply the direction and decide whether the result moves you.
That division makes a request much more actionable. “Make this more emotional” leaves the mechanism open. “Keep the first four notes, reduce the accompaniment in the second phrase, delay the highest note until the final bar and give the last note more space” identifies changes that can be made and heard.
Choose the route before asking for the result
| Route | What you give Astra | What you should receive | What produces the sound |
|---|---|---|---|
| Musical planning | A brief, note list, score or description of a problem | Chords, note events, arrangement and revision decisions | You and your instruments |
| MIDI generation | Tempo, meter, instrumentation and note constraints | Editable MIDI plus readable generation code | A DAW or software synth |
| Live coding | A musical brief and the target language | Complete Strudel, Sonic Pi or similar code | That music environment |
| DAW control | An available computer-use tool or verified bridge | Observable edits to a session | The DAW and its instruments |
| Generative-audio handoff | A detailed brief and an available audio tool | Audio material, stems or prompts for that tool | The named audio-generation service |
The table describes workflow choices, not a claim that every connection is installed. If there is no working Ableton bridge, MIDI is still a useful route. If a tool only returns stereo audio, do not assume you can edit its original notes. If the model can inspect a spectrogram but cannot audition the recording, ask for measurable analysis and keep the listening judgment with someone who can hear it.
Use Extra High, Max and Ultra for different jobs
OpenAI’s current product guidance distinguishes High and Extra High for difficult work, Max for more time reasoning about a single task, and Ultra for work divided across subagents. Availability varies by client and account. In the desktop app, Ultra may need to be enabled under Settings → Configuration → Ultra in model picker slider. Select the setting before sending the request; adding “use Ultra” to a prompt does not change the picker. Model and reasoning guidance
For this kind of comprehensive project, Ultra is useful when the work separates naturally: one strand checks software documentation, another develops note-generation code, and another reviews arrangement continuity. Keep one shared musical brief and one owner of the final score. Independent agents inventing incompatible tempos, keys and file conventions create extra work.
Max is a sensible choice when the main problem is one tightly connected composition: a melody whose harmony keeps failing, an intricate rhythmic transformation, or a long arrangement that needs a consistent thematic arc. Extra High can be enough for a substantial but well-defined production task. No setting guarantees taste. Judge the exported result and the quality of the editable material.
The public API is a separate configuration surface. The Astra model page lists low, medium, high, xhigh and max for reasoning.effort; it does not list ultra as an Astra API effort value. Do not translate a desktop mode into an unsupported API parameter. A custom multi-agent application requires its own orchestration.
Here is a useful division of work for an ambitious session:
Work from one shared brief: 130 BPM, 4/4, D minor, five tracks, eight sections, original music. Independently check the available tools, develop the melodic and harmonic plan, and review the resulting arrangement where within-task subagents are available. Keep one authoritative score. Resolve disagreements by the musical brief and verified tool behavior. Report what was generated, what was executed, and what still needs listening judgment. Do not change the chosen model setting or claim that this prompt does so.
Give Astra a brief with musical consequences
A good brief does more than name a genre. It sets up relationships: how much room the drums leave, where the melody becomes intense, what changes when a section returns, and what the listener should remember afterward.
For Midnight Circuit, the central contrast is a clipped, syncopated rhythm section against a sustained harmonic background. The melody has a recognizable call. The middle of the piece removes weight so its return can matter. The ending resolves the phrase instead of fading a loop indefinitely. These are compositional choices you can evaluate.
Use this template and replace the bracketed material:
Create an original [duration] composition for [instruments or tracks] at [tempo] in [meter]. The emotional direction is [specific scene or tension]. The listener should remember [a melodic/rhythmic identity]. Use [harmonic language or constraints]. Develop the idea through [section plan]. Reserve [instrument, register or density] for the strongest section. End with [resolution or deliberate ambiguity]. Deliver [MIDI/code/session instructions], explain the important musical choices briefly, and preserve an editable version. Use only the instruments and tools listed here: [available setup].
The emotion can be concrete without asking for an imitation of a specific song. Try “the last train leaving a quiet city, moving from uncertainty to relief” rather than a string of superlatives. Translate that scene into decisions: a narrow opening register, a late bass entrance, a higher answer when the harmony opens, and a final return to the home note.
Ask for alternatives you can compare
Request two or three candidates with a controlled difference. Three completely unrelated songs are hard to compare. Three answers to the same two-bar motif reveal something useful about density, contour and tension.
Keep the rhythm and first three notes of this motif. Write three endings: restrained, restless and resolved. Give exact MIDI pitches, start beats and durations. Use the same accompaniment under all three so I can compare the melodic choice.
If one version is louder, brighter or more heavily processed, it may win attention for the wrong reason. Compare the notes with the same instrument first. Only then develop the sound.
Turn vague feedback into an editable request
| What you hear | A more useful revision request |
|---|---|
| “The loop gets boring.” | Keep the hook. Change its answer in the second eight bars, withhold bass before the return, and use one contrasting register in the middle section. |
| “The groove feels stiff.” | Preserve the main kick and snare anchors. Vary softer hats and ghost notes by phrase, and give the bass a few intentional gaps. |
| “Everything sounds crowded.” | Remove one competing part at each lead entrance. Shorten chord releases and keep the pad out of the melody’s most active register. |
| “The drop is weak.” | Change the preceding section: reduce low-end energy, simplify its last phrase, then restore the established groove on the boundary. |
| “It has no ending.” | Write a final melodic answer, resolve or deliberately suspend the harmony, remove percussion in a planned order, and leave time for the tails. |
These requests are starting hypotheses. Listen again after each change. More variation is not always an improvement; sometimes the hook needs another clear repetition.
Reproduce the original MIDI example
The complete download includes the generator, so you can inspect how the composition was constructed and make a controlled change. Extract the ZIP into a new folder. With Python 3.10 or later installed, open a terminal in that folder and run:
python3 generate_midnight_circuit.py --out generatedThis creates eight MIDI files and a JSON score. MIDI generation uses Python’s standard library: it needs no API key, network connection, samples or additional packages. The full file contains a tempo/marker track plus five instrument tracks, with 960 ticks per quarter note. The source fixes its variation seed at 260907.
The optional renderer synthesizes its own sounds and needs NumPy. The supplied WAVs are already rendered, so this step is only necessary if you want to regenerate audio after editing the score:
python3 -m pip install numpy
python3 render_preview.py --out generated
python3 validate_example.py generated
Use your preferred Python environment for the optional dependency. The validator expects both the generated MIDI and the three rendered WAV files. It checks note pairing, timing, pitch bounds, file structure and basic signal properties.
Our full score contains 1,926 note events. Its reference WAV runs 1:58.154, is stereo 32 kHz/16-bit PCM, peaks at −3.941 dBFS and has zero clipped PCM samples. The two comparison WAVs both measure −20 dBFS RMS; that is electrical level matching, not a claim of identical perceived loudness. The on-page players use MP3 copies for convenient streaming, while the ZIP contains the original WAVs.
The basic comparison is deliberately straight and repetitive. The revised comparison develops bars 9–24 with swing, syncopation, richer harmony, a pad and changing melodic answers. Several choices change together, so this is an illustration of revision rather than a controlled experiment on one variable or on Astra’s reasoning modes.
Ask Astra to edit the generator or score with a bounded request:
Preserve the tempo, form and first three notes of the main call. Change only the lead answers in bars 17–24. Produce a separate version, report the changed note events and regenerate the MIDI. Keep the original files. Use the same instruments for the comparison so the musical edit remains easy to assess.
Build “Midnight Circuit” in Ableton Live
Example classification: proposed workflow developed for this guide. “Midnight Circuit” is an original 64-bar melodic UK garage sketch at 130 BPM in D minor. Its five parts—drums, bass, chords, lead and pad—give Astra concrete musical material to develop. The following sound settings are suggested starting points, not a claim that this project has been auditioned inside Ableton. The companion reference render uses its own synthesis; these Live patches are a production interpretation.
The musical target is specific: a syncopated bass line under clipped, warm chords; a five-note hook you can remember; a quiet middle section that makes the return feel earned. At roughly two minutes, the arrangement is long enough to demonstrate development without disguising a weak idea inside a six-minute loop.
1. Set up a project you can finish
Create a new Set, choose 4/4 and 130 BPM, and save it as Midnight Circuit. Use Arrangement View for the walkthrough. Create or rename five MIDI tracks as Drums, Bass, Chords, Lead and Pad. Rename the Set’s two existing returns Room and Echoes; if your template has fewer, add only the missing returns.
Live 12 Intro is sufficient: its 16-track and two-return limits accommodate this project, and it includes Drum Rack, Simpler, Drift, Instrument Rack, Compressor, Reverb, Delay and Utility. Standard offers additional devices; Suite adds more instruments and Max for Live. The main recipe does not depend on EQ Eight, Drum Buss, Echo or Hybrid Reverb. Ableton edition comparison
Put Reverb on Room and Delay on Echoes, both fully wet. Start every track’s sends fully down (−∞ dB). A return is a shared effects destination: raising a track’s send mixes some of that track into the room or echoes. Start with quiet monitoring and moderate track levels; leave room for the parts to add together.
2. Import notes, then assign sounds
Drag each companion MIDI part into its corresponding track at bar 1. Alternatively, import the combined Type 1 MIDI file into a fresh Set; Type 1 stores parts separately, which Live imports onto separate tracks. Use one route. Loading both would double the material. MIDI describes performance instructions, so it still needs instruments to make sound. Ableton’s MIDI import guide
Confirm that all five parts begin at the same arrangement position, the tempo remains 130, and the musical form ends after bar 64. Initial silence on a part can be intentional: a lead that enters later should not be dragged left to eliminate that silence.
Use MIDI numbers when checking pitches. Software disagrees about octave labels; Live calls MIDI note 60 C3. A bass D at MIDI 38 remains the same pitch whatever another program calls its octave. Cycling ’74’s Clip reference
3. Understand the harmony before adding effects
The eight-bar cycle gives each chord two bars:
| Bars within the cycle | Chord | Upper chord notes, as MIDI numbers | Bass root |
|---|---|---|---|
| 1–2 | Dm9 | F–A–C–E: 53, 57, 60, 64 | D: 38 |
| 3–4 | B♭maj7 | F–A–B♭–D: 53, 57, 58, 62 | B♭: 34 |
| 5–6 | Fmaj7 | F–A–C–E: 53, 57, 60, 64 | F: 41 |
| 7–8 | Cadd9 | G–C–D–E: 55, 60, 62, 64 | C: 36 |
The Dm9 voicing intentionally omits D: bass and pad provide the root. Dm9 and Fmaj7 share the same upper notes, but the bass changes their meaning. That creates harmonic movement without making every voice jump. A voicing is simply the chosen register and spacing of a chord’s notes.
The lead’s call uses D–F–E–A–C, MIDI 74, 77, 76, 69, 72. Preserve its rhythm and contour when developing answers. Ask Astra to alter the last two notes, shorten a response or leave a half-bar gap before you request an entirely new melody. Listeners need enough repetition to recognize the hook.
4. Build the five sounds
Load an empty Drum Rack. Choose short stock one-shots and map kick to 36, snare to 38, rim to 37, clap to 39, closed hat to 42 and open hat to 46. Set closed and open hats to the same choke group so one interrupts the other. Dropping a sample onto an empty pad creates a Simpler chain; its Receive note determines which MIDI note triggers it. Ableton’s Drum Rack documentation
Choose a compact kick that leaves space between hits, a snare with a clear center, and hats that do not hiss over the melody. The clap should reinforce selected backbeats, not become a permanent second snare at full volume. Audition your choices against the bass, since a great isolated kick can be wrong for the track.
Load Drift on each melodic track. Drift provides two oscillators, filtering, amplitude shaping and assignable modulation. Envelope 1 shapes amplitude; Envelope 2 can move another parameter such as cutoff. The recipes below use those documented controls, with original values proposed for this track. Drift reference
| Part | Suggested starting patch | What to listen for |
|---|---|---|
| Bass | Oscillator 1 Sine; oscillator 2 off; Mono; Drift near zero; amplitude attack 5 ms, decay 180 ms, sustain around 65%, release 65 ms. | Weight and clearly separated notes. Lengthen attack slightly if note starts click; shorten release if consecutive notes blur. |
| Chords | Saw oscillator 1 with a quieter Triangle oscillator 2; Poly, 8 voices; low-pass cutoff around 2.2 kHz; attack 4 ms, decay 260 ms, low sustain, release 110 ms. | A warm stab that leaves holes for the lead. Increase decay only until the harmony reads clearly. |
| Lead | Triangle oscillator 1 with a quieter Saw oscillator 2; Poly, 8 voices to preserve overlapping pickups; cutoff around 3.5 kHz; attack 8 ms, decay 300 ms, sustain around 35%, release 160 ms. | A distinct, almost vocal outline. Keep the attack audible without making every note sharp. |
| Pad | Two quiet Saw oscillators; Stereo, 32 voices for the five-note chords and overlapping releases; restrained Drift; cutoff around 1.3 kHz; attack 450 ms, release 1.2 s. | A background harmonic glow. Reduce level or release before adding more equalization. |
An oscillator generates the raw tone; a filter removes some of its frequency content. An envelope controls how a sound develops after a note starts and ends. These parameters become meaningful when linked to a musical role: the bass needs clean gaps; the pad needs continuity.
Give chords a small Room send and lead a little Echoes. Try a short room decay around 0.8 seconds and a tempo-synced delay with about 18% feedback. Increase either only when the phrase has space for it. Keep bass dry initially.
5. Preserve the groove already in the MIDI
The supplied performance already includes timing and velocity variation. Its offbeat sixteenths receive a 0.035-beat delay—about 16 milliseconds at this tempo—plus small seeded timing differences. Begin with no additional clip groove applied.
For a new, straight version, try a sixteenth-note swing groove at modest Timing, with Random and Velocity initially zero. Live’s Groove Pool allows these components to be adjusted independently; Commit writes the result into the clip. Save a copy before committing if you want easy comparison. Using Grooves
Listen to kick, snare and bass together first. Then bring in hats. A useful velocity hierarchy is stronger backbeats, quieter ghost notes and alternating hat emphasis. Treat 100–112 for kick accents, 92–108 for main snares, 30–50 for ghost hits and 45–78 for hats as editing suggestions, not mandatory replacements for the companion performance. If every hit demands attention, reduce the unimportant ones.
6. Make eight sections tell one story
Place locators at bars 1, 9, 17, 25, 33, 41, 49 and 57. Use this map to understand the companion arrangement and guide further production:
| Bars | Section | Production direction |
|---|---|---|
| 1–8 | Intro | Establish the pad and a restrained rhythmic outline. Keep full bass weight and the complete hook in reserve. |
| 9–16 | A | Introduce the main drum/bass conversation and recognizable lead call. |
| 17–24 | Variation | Keep the identity; change the lead answer and add small drum details near the boundary. |
| 25–32 | B | Increase activity through chord rhythm and melodic response. Make the last bar anticipate the change. |
| 33–40 | Breakdown | Remove low-end pressure, expose harmony and leave audible space around the motif. |
| 41–48 | Return | Restore bass and the familiar groove. Let recognition provide the impact. |
| 49–56 | Climax | Use the fullest response and brightest tone; preserve enough gaps for individual parts to remain distinct. |
| 57–64 | Outro | Remove layers, resolve the lead toward D and allow the final harmony to decay. |
Avoid adding a new instrument whenever energy needs to rise. Shorter gaps, a brighter chord attack, an octave response or the return of an absent bass can each carry a section. The strongest contrast often comes from what the preceding section withheld.
7. Automate three purposeful movements
Turn on Arrangement Automation Mode, then click a device or mixer control to display its envelope. Add breakpoints for the changes you want. Ableton automation documentation
Try three moves: gradually open the chord cutoff across bars 25–32; send the last lead phrase before the breakdown into more delay; reduce the pad’s brightness as the outro empties. Reset the delay send when the new section begins so the effect remains a phrase ending, not a blanket.
For a performance control, group the chord instrument into an Instrument Rack. Map cutoff to a Macro named Open, with a restrained range such as 900 Hz to 5 kHz. Rack mappings let you constrain the range rather than making the whole parameter travel available. Ableton Macro mapping
Balance the parts before compressing. If the kick and bass still collide, try Compressor on bass with the kick as external sidechain trigger. Start near 3:1, 5 ms attack and 90 ms release, then adjust threshold for a few decibels of reduction on kick hits. The triggering signal controls compression; it is not mixed into the bass by that routing. Compressor reference
8. Finish, export and evaluate one revision
The supplied ending removes percussion for bars 63–64, returns the pad to Dm9, holds bass D and answers a final F with lead D. Preserve that resolution as you adjust the sounds. Select the arrangement plus enough empty time for its actual reverb and delay tails. Export the Main output as a stereo WAV, with Normalize and Render as Loop off. A 32-bit export is useful for further processing; make a final lower-bit-depth copy with appropriate dither only at the final reduction. Verify that Arrangement playback is active before rendering. Ableton export reference
Listen to the exported file from beginning to end. Evaluate four things: can you remember the hook, do kick and bass speak clearly, does the breakdown strengthen the return, and does the ending feel intentional? Select the weakest one and request a bounded revision:
Revise only bars 17–24 of the lead. Keep the first three notes of the call, the chord progression, tempo and groove. Write two alternative answers: one with fewer notes and one with a wider final leap. Keep all notes within D natural minor. Explain what each changes emotionally, and give exact MIDI pitches, starts, durations and velocities. Preserve the original as version A.
Compare versions at similar loudness. Keep the revision only when it improves the named musical problem.
Advanced: use Max for Live as a controlled editing layer
Max for Live is included in Suite and available as an add-on for Standard; Intro and Lite do not support it. Max for Live requirements
A custom device can translate structured note plans into Live edits through its Live Object Model. This requires an actual device and a communication path; mentioning Ableton in a chat does not establish that connection. Cycling ’74 documents live.path, live.object and JavaScript access to the API. Live API device guide
A small first milestone is enough. Resolve an empty MIDI Session slot, call create_clip with length 32 for eight bars of 4/4, and then resolve its Clip object. Creation is valid only for an empty MIDI slot. ClipSlot reference
On that Clip, add_new_notes accepts a dictionary containing a notes list. Each note supplies pitch, start_time and duration; add explicit velocity values. Times are beats, starting from zero. Read notes back with get_all_notes_extended; for edits, retain note IDs and use apply_note_modifications. Clip API
Because API messages are deferred, confirm that the created object exists before sending dependent operations. live.path reference Preview changes in a disposable clip, check note counts and bounds, and only then integrate the device into a production Set. That is a useful engineering project for Astra: build one observable, reversible editing capability, verify it, and expand when the music needs more.
Beyond Ableton: choose the tool that makes the idea editable
The most useful role for Astra is often to make a musical decision concrete: a MIDI phrase, a sequencer, a processor, or a reproducible arrangement. Your choice of software determines what you can actually change afterward. Start with the program you know; introduce another tool when it solves a specific problem.
The software capabilities below are documented by their developers. The Astra workflows are proposed applications of those capabilities, except where a creator’s experience is explicitly attributed. Our original Strudel example passed a browser execution check; we did not independently audition the reference performances or reproduce the other integrations. Sources were checked on September 7, 2026.
Strudel: turn a musical brief into an instrument you can inspect
Strudel makes a particularly approachable starting point because its code describes musical patterns directly. You can inspect the notes, rhythms and transformations instead of accepting a finished audio file as an indivisible result.
Open the Strudel editor, replace the existing code with this complete example, and click Play. Click Stop when finished. It uses the default drum sounds and built-in oscillators; the drum samples may take a moment to load on the first run. The definitions of those sounds and the tempo convention are covered in First Sounds and Synths.
setcpm(100 / 4)
stack(
  s("bd*4").gain(0.6),
  s("~ sd ~ sd").gain(0.3),
  s("hh*8").gain(0.1),
  note("<c2 ab1 f1 g1>").struct("x ~ x ~")
    .s("sawtooth").lpf(450).release(0.18).gain(0.2),
  note("<[c4,eb4,g4] [ab3,c4,eb4] [f3,ab3,c4] [g3,b3,d4]>")
    .s("triangle").release(0.7).gain(0.12)
)
This is a four-bar foundation at 100 BPM, moving through C minor, A-flat major, F minor and G major. The B-natural in the last chord creates a stronger pull back to C. It gives Astra something specific to develop: preserve the harmonic identity while adding a recognisable melody, an eight-bar response, a contrasting middle section and an ending.
Try this follow-up:
Develop this into a 64-bar piece. Keep the four-chord identity and 100 BPM. Introduce a two-bar motif, answer it with a changed ending, thin the drums before the main return, and write a deliberate final cadence. Explain the section boundaries. Provide complete replacement Strudel code and identify any new sample dependencies.
For an Ableton handoff, Strudel’s MIDI documentation describes output through a virtual MIDI port, including macOS’s IAC Driver. Route the notes to Live instruments and record the result as MIDI. Check clock configuration, channel assignments and latency before recording a full performance. MIDI carries performance instructions; it does not preserve Strudel’s synthesizer sound.
REAPER: turn repeatable production work into scripts
REAPER’s ReaScript system accepts Lua, EEL2 and Python. Lua is a convenient starting point because it is embedded in REAPER. Scripts can invoke actions and much of the application’s API; the installed application can generate its own current API reference.
Ask Astra for a small Lua script that creates named tracks and arrangement markers, then extend it to place MIDI phrases. Specify the tempo, meter, exact bar boundaries and whether existing material must be preserved. Load the script through the Actions window and run it in a duplicate project.
A good musical task is a 45-second cue with three energy levels built from one motif. Ask for separate bass, harmony and melody parts, then use instruments you already own. Review the result in REAPER before asking for the next revision. Scriptable session construction is a documented capability; the quality of an Astra-authored cue remains something to judge from its actual playback.
Basic Pitch: keep the idea you already sang
Sometimes the strongest starting prompt is your own performance. Spotify’s Basic Pitch converts audio to MIDI, including pitch bends. It supports polyphonic material but works best with one instrument at a time. Its browser demonstration accepts a recording or microphone input and lets you download MIDI for correction in a DAW.
Record a short, clear melody without accompaniment, convert it, then compare the MIDI with the original. Correct stray notes, octave errors and phrase boundaries before reharmonizing it. Ask Astra to preserve the melody’s contour and important accents while proposing three accompaniments: sparse piano, a syncopated rhythm section and sustained strings. Keep the original recording available so that transcription cleanup does not erase the performance’s character.
Sonic Pi: practice composition as live performance
Sonic Pi is a free code-based music environment with MIDI, OSC and Ableton Link support. Its tutorial teaches named live loops, synthesis and effects. These are useful building blocks for an Astra-assisted performance script.
Ask for a composition with separately named drum, bass, harmony and melody loops, plus a small list of safe parameters to change during playback. Start with density, filter cutoff and one melodic transformation. Practice the changes as musical gestures: remove the bass before a return, shorten a phrase to increase tension, then restore its original length. Keep arrangement decisions understandable enough to perform manually.
Suno Studio: generate material, then make production decisions
Suno Studio 2.0, documented in August 2026, combines generative audio with MIDI tracks, a piano roll, built-in effects and synths, audio-to-MIDI conversion, and stem separation. It is available to Premier subscribers. The documentation explicitly says it has no direct DAW sync or plugin-host integration and does not host conventional VST or Audio Units plugins.
The practical Ableton connection is therefore a file handoff. Have Astra develop the brief and evaluate alternatives against it; export the chosen material as audio or stems, then import it into Live. Confirm the tempo, starting point and phrase length before adding instruments. Suno itself acknowledges that some generations may land slightly ahead of or behind the beat.
Use this route when the generated texture or performance contributes something useful. Replace distracting parts, edit the arrangement and retain your own musical intent. Credit the division of work accurately: Suno generated the audio; Astra helped with specified planning, coding or production decisions.
Logic, FL Studio and Bitwig: use their actual extension points
Logic Pro’s Scripter exposes a JavaScript API for MIDI processing. A constrained arpeggiator or velocity processor is a sensible Astra coding task; Scripter is not a universal API for every Logic operation.
FL Studio’s Piano roll scripting API uses Python to create and transform notes and markers. It includes tutorial scripts and custom controls. Store your .pyscript in the documented user scripts folder, and consult the reference shipped with your installed version. A phrase-aware humanizer should preserve accents and alignments rather than randomize every note equally.
Bitwig’s controller documentation supports Java or JavaScript customization and points to the application’s developer resources. Ask for a specific controller mapping or performance control, then validate it against that API. A controller extension should not be presented as unrestricted access to the entire DAW.
Eight online examples worth studying
These are references for technique and possibility. Only the first is a creator-reported GPT-6 Astra case study; the others demonstrate music software or human creative work. They are not a ranking based on our own listening tests.
| Example | Why it belongs in this guide |
|---|---|
| Sound for Movement: GPT-6 Astra for Professional Musicians | The creator describes Ableton computer control, a Max/OSC bridge and custom music software. The article’s four-bar melody and piano-improvisation examples suggest concrete experiments. These claims were not independently reproduced; some software is described as awaiting wider release. |
| ELPHNT: Generate Endless Musical Ideas | Ableton’s May 2018 article embeds two tutorials and links a template set. Study the separation of rhythm, harmony and variation, then ask Astra to work within similarly explicit constraints. |
| eddyflux: “coastline” | A credited, complete Strudel example combines drums, harmony, bass and melody. Inspect how a compact program coordinates several musical roles. |
| DJ_Dave: “Array” | A performance linked from Sonic Pi’s own site. Use it as a reference for code as a performance medium, not evidence of AI authorship. |
| Jylda and Sam Aaron: “Reeled” | Another official Sonic Pi performance reference, useful when considering a live-coding arrangement around a human performer. |
| Spotify’s Basic Pitch demonstration | An interactive way to explore an audio-to-MIDI handoff. Compare your original phrase with the transcription before asking Astra to develop it. |
| FL Studio: Random Melody tutorial script | A developer-supplied generative-note example. Use it as a baseline, then ask for motif continuity, phrasing and controlled variation rather than unrestricted randomness. |
| Suno: Introduction to Studio 2.0 | The tutorial linked by Suno’s official help article introduces the production environment. Use it to understand the editing surface before designing an Astra-assisted stem workflow. |
One naming trap: Splice also sells a synthesizer called Astra. It is a separate product. A video about that synth’s presets or DAW compatibility is not evidence about GPT-6 Astra.
Build a hybrid track from generated audio and your own ideas
A hybrid workflow makes sense when a generated texture, vocal sketch or unusual instrument suggests something you would not have written at the keyboard. The challenge is to turn that discovery into a deliberate composition. Generating another complete song every time something disappoints you can erase the part that was worth keeping.
Start with an idea you control: a sung phrase, a four-chord progression, a rhythmic pattern or a short recorded performance. Write down the qualities that must survive. For example, the sung melody may rise gradually and fall abruptly on its last word. That contour can remain recognizable even if you change the tempo and accompaniment.
Step 1: define the contribution you need
Suppose the target is a 60-second cinematic cue: a fragile opening, a gradual rhythmic build and a resolved final statement. You already have a six-note piano motif. Ask Astra for a plan that uses it across three stages, then decide which element benefits from generative audio.
I have an original six-note piano motif. Build a 60-second cue around it: sparse opening, rising middle, clear final statement. Preserve the motif’s contour and last note. Suggest one background texture worth generating, describe its musical role, and specify which parts should remain editable MIDI. Give section timings and leave a clean ending for dialogue or a scene cut.
The answer might call for a breathy ambient texture under the opening while leaving piano, bass and pulse as MIDI. That is an editorial choice, not a requirement of the technology. It gives you control over the parts that need precise harmony and timing.
Step 2: generate or select the material
Give the audio tool a narrow job. Specify duration, density, presence of percussion, tonal center and whether it should have an obvious lead melody. “Low-density, wordless atmospheric texture with no drums and no prominent melody” leaves more arrangement space than “epic cinematic masterpiece.”
Keep a note of the service, model or feature name, prompt and export conditions. If you use a commercial service, check its current export and usage terms for your account. Generated material still needs a practical rights and provenance record; a successful download is not a legal conclusion about every possible use.
Before selecting a take, play its beginning and ending as well as its most impressive moment. A texture that changes key halfway through or contains an unexpected vocal syllable may create more cleanup than value. Choose the version that serves the composition.
Step 3: bring it into Live at a common origin
Import the chosen files into a new Set. Keep stems aligned at the same starting position and retain an untouched copy. Confirm the actual tempo and phrase boundaries before adding tightly quantized parts. If a file drifts, decide whether to warp it, slice it or let it remain a freer layer; do not make that decision automatically just because the grid is visible. Ableton’s audio and warping reference explains how clip timing relates to the project tempo.
Stem separation can help isolate a useful part, but it does not recover the original session. Ableton documents native vocals, drums, bass and other separation in Live Suite from 12.3. That means an external separator is an option rather than a universal prerequisite. Listen for smearing, missing transients and remnants of the other parts before treating a separated stem as a clean recording. Ableton stem separation
Step 4: replace what weakens the idea
Add your own bass and chord voicings under the texture. If the original generation has an exciting atmosphere but an unconvincing groove, use the atmosphere and build the groove yourself. If its melodic line competes with your motif, edit around the conflict or choose a less dominant source. Separation quality is only one variable; arrangement can solve some collisions more effectively than further processing.
Ask Astra to work from a precise description, a transcribed note list or an available audio-analysis result. Do not accept “I listened” as a substitute for an actual audio-capable tool. A clear analysis report might identify onset timing or estimated pitch; your listening still determines whether the texture belongs.
Step 5: commit an arrangement and finish it
For the 60-second cue, map the opening motif, the first pulse, the strongest statement and the ending before making another generation. A useful draft can be as simple as four layers: piano, pulse, bass and texture. Use changes in register, note length and density to develop them.
Export a reference mix and compare it with the written brief. Does the opening leave room for the scene? Does the middle build rather than merely get louder? Does the final statement sound like the same musical idea transformed? Fix the weakest answer, keep the source versions and finish a second export. The contribution of each system should remain clear: which audio was generated, which notes Astra helped specify, and which performance or editing decisions you made.
Three further experiments with a clear musical payoff
Once the main workflow is comfortable, change one important dimension at a time. These are original proposed exercises, not additional tested tracks.
A neo-soul reharmonization. Start with an eight-bar melody at 86 BPM. Keep its important accented notes, then request two accompaniments: one with close, economical voice leading and one with more open voicings. Give bass and inner voices independent movement. Hear both on the same piano patch before adding drums. The test is whether the new chords illuminate the melody or distract from it.
A cinematic transformation. Take a four-note motif and build three versions for a 45-second cue: isolated piano, a measured low pulse, and a broad final statement. Preserve a recognizable interval pattern while changing register and note duration. Reserve the loudest or highest material for the last version. The test is whether the listener can follow one idea through a changing emotional context.
A live-coded arrangement. Begin with the Strudel example above. Add a lead, then create a performance plan with five moves: introduce harmony, add bass, increase rhythmic detail, remove weight, and return. Practice the changes manually. The test is whether you can explain and perform each transition, rather than relying on a program that becomes too complicated to control.
Each exercise gives Astra a problem with musical consequences. It also gives you a reason to reject a technically correct answer that sounds unconvincing.
A prompt library for the moments that usually stall a track
Use these prompts with actual notes, code or a project description. Replace the bracketed text. They are intended as separate production tools; you do not need to send all of them in one enormous request.
1. Write a hook with an identity
Write a two-bar lead motif at [tempo] in [key] over [chords]. Use a recognizable rhythm, at least one meaningful rest, and a clear high point. Give two versions that differ only in the ending. Return MIDI pitches, start beats, durations and velocities, plus a short explanation of the contour.
2. Make the second phrase earn its place
Here is my first phrase: [notes]. Write a response that preserves its identity but changes the final two beats. Keep the accompaniment unchanged. Try one response with fewer notes and one with a wider interval. Do not add a new instrument.
3. Improve voice leading
Revoice [progression] for [instrument and register]. Keep common tones when useful, minimize unnecessary leaps in inner voices, and leave room for the melody at [register]. List each voice through the progression and identify any intentional larger leap.
4. Make bass and kick cooperate
My kick pattern is [beat positions]. Write a bass part for [chords] that supports those accents without copying every kick. Use intentional rests and control note lengths near the busiest hits. Give exact events and explain two places where the silence matters.
5. Humanize a phrase, not every note equally
Keep the important rhythm anchors fixed. Add restrained, repeatable timing and velocity variation to [part], with stronger phrase accents and quieter supporting notes. Use a recorded random seed. Preserve intended unisons and chord attacks; report the largest timing change.
6. Develop an eight-bar loop
Develop this loop into [length] using [available tracks]. Keep the hook and harmonic identity. Give each section one primary change in density, register, rhythm or sound. Mark where an element is withheld and where it returns. Avoid adding instruments merely to fill space.
7. Make a transition through arrangement
Improve the transition from [section] to [section]. Propose one version using subtraction, one using a phrase-ending fill, and one using a harmonic or melodic anticipation. Keep the tempo and overall length. Provide exact bars and events for each.
8. Design a sound for its role
Suggest starting settings for [available synthesizer] to make a [musical role] sound. Use only documented controls. Specify oscillator choices, amplitude envelope, filter and modulation. Explain what I should hear when adjusting each important control. Distinguish suggested values from verified presets.
9. Build a bounded MIDI tool
Write a [language/environment] tool that transforms an eight-bar MIDI phrase by [one operation]. Use the documented API for [version]. Include an undo or new-output route, deterministic variation, and a way to read back the result. Preserve notes outside the selected phrase.
10. Repair an unconvincing ending
Write the final eight bars of this piece. Resolve the established motif, choose a clear harmonic destination, remove layers deliberately and leave space for effect tails. Keep the ending related to the opening. Return separate note and production instructions.
11. Diagnose a mix from real evidence
Review the available audio measurements and my listening notes: [material]. Separate measurable facts from interpretations. Rank the three most likely causes of [problem]. Suggest the smallest arrangement, sound or level change that can test each cause. Do not claim an audition unless an audio-capable tool was used.
12. Preserve the good parts during revision
Version A works in these ways: [strengths]. Its main problem is [one issue]. Change only [scope]. Save version B separately, list the changed events or settings and give me one listening test. Preserve the tempo, key, strong motifs and unaffected tracks.
13. Prepare a reliable handoff
Prepare this project for another musician using [DAW/version]. Export the agreed MIDI and audio parts from a common start, name files clearly, state the tempo and meter, list required instruments and samples, and include a reference mix. Identify anything that cannot be recreated from the delivered files.
14. Compare Max or Ultra use honestly
Keep the brief, source material, tools and success criteria fixed. If comparable runs at different selected reasoning modes are available, compare their actual files and revision needs. Separate completion, musical structure and listening preference. Do not infer that a longer run or more agents produced better music.
Listen for the things that code validation cannot tell you
A valid MIDI file can still contain a forgettable melody. A clean WAV can still have a weak arrangement. Technical checks remove some failure modes; they do not decide whether a song has character.
First, listen without watching the arrangement. If you cannot remember any part afterward, the central idea may need a clearer rhythm, contour or repetition. Avoid trying to rescue it with another effect. Hum the part you want someone else to remember and compare that with what the lead actually plays.
Second, listen quietly. When the mix loses its identity at a low level, the arrangement may depend too much on loudness. Bring the main idea forward by reducing competitors, then consider the sound choice. A brighter patch can be useful, but brightness alone is not clarity.
Third, compare the busiest section with the section immediately before it. If the difference is hard to perceive, change the setup. Remove some bass, simplify percussion or narrow the register before the return. Energy depends on context.
Finally, listen to the complete exported file. Check the start, section boundaries, final note and effect tails. Monitor meters for clipping, but also listen for note clicks, abrupt cuts, noisy sample endings and unintended silence. If you distribute stems, audition them from their common start and confirm their alignment.
Use the basic-versus-revised files in the companion download to practice comparison. The revision changes timing, dynamics and phrase detail. Compare at similar playback levels and identify which particular changes you prefer. These examples are an illustration of editing decisions, not a benchmark proving that one reasoning setting is superior.
Troubleshooting the common failures
| Problem | First useful check | Practical next step |
|---|---|---|
| The MIDI is silent | Is an instrument loaded, and is the track routed to an audible output? | Load the intended instrument and play a known note before debugging the score. |
| The drums play the wrong sounds | Do the MIDI note numbers match the Drum Rack mapping? | Use the supplied note map. Octave names can differ between programs. |
| Parts start at different times | Did every file retain its original silence and common start? | Reimport at bar 1 and check a known downbeat across all tracks. |
| The groove is exaggerated | Was swing or humanization applied twice? | Remove the extra groove before changing the source notes. |
| The bass is muddy | Are note releases and kick tails overlapping? | Shorten or separate them before adding more processing. |
| The lead disappears | Are chords or pad competing in the same register? | Reduce density or move supporting voices before simply raising the lead. |
| The code runs but sounds wrong | Are timing units, note names and tempo conventions correct? | Test one bar, one instrument and a known pulse. |
| A generated stem drifts | Does its timing actually follow the project grid? | Confirm phrase boundaries and choose a deliberate warping or slicing approach. |
| The render ends abruptly | Was there time for releases, reverb and delay? | Extend the render region and replay the ending. |
| Astra says it changed Ableton but nothing happened | Is there an available, functioning control route? | Inspect the session state; use MIDI output while repairing the connection. |
Keep a working version before making a repair. When a problem is isolated to one clip or setting, make a local correction rather than rebuilding the entire song.
Questions musicians will reasonably ask
Can GPT-6 Astra generate a finished song by itself?
The public model endpoint is documented with text output. A complete music workflow can include code, computer control and other sound-producing tools, but those tools must actually be available. Ask which system produced the audio and which editable files remain. A text instruction alone does not supply a synthesizer, a DAW connection or a music-generation service.
Do I need Ableton Live Suite?
The five-track stock-instrument recipe here is designed to fit Live 12 Intro. The advanced Max for Live path has different requirements, and native stem separation starts with Suite 12.3. Verify the edition and features you plan to use before buying or upgrading. The browser Strudel example is another starting route.
Is this the same Astra that appears in Splice tutorials?
No. Splice’s Astra is a software synthesizer. GPT-6 Astra is the OpenAI model discussed here. A search result about a synthesizer’s VST or AU compatibility does not establish GPT-6’s access to your DAW.
Does Ultra automatically make better music than Max?
The modes organize work differently. Ultra can help with independent research, implementation and review; Max concentrates deeper reasoning on one task. A controlled comparison requires the same brief and comparable tools, followed by inspection and listening. We did not run that benchmark for this guide.
Can I use another DAW?
Yes: the portable idea is editable notes, a clear arrangement and an explicit handoff. Use the actual import and scripting capabilities of your chosen software. The tools section identifies useful extension points without assuming they provide complete remote control.
Can I release music made through these workflows?
Check the terms for every generated source, sample, voice and service used in your track, as well as the permissions for any material you supplied. Keep records of your own composition and editing contributions. This guide does not make a blanket claim about copyright ownership or commercial clearance.
What should I do after the first successful render?
Choose the single improvement with the clearest musical payoff, make a separate version, compare it and finish the track. Keep the MIDI, source code, reference audio and production notes together. The valuable outcome is a piece you can hear, understand and keep developing.
A useful next session
Start with Midnight Circuit or your own eight-bar idea. Choose one sound for each musical role and make the main phrase work before expanding the arrangement. Ask Astra for exact changes, preserve the good material, and judge the result through playback.
If you are still setting up the agent environment, Kingy’s Codex operating guide explains the broader workflow. The source-linked examples in this article provide the music-specific routes. Together, the goal is straightforward: turn an interesting musical intention into editable material, then keep making deliberate choices until the piece feels complete.
Buying details checked October 22, 2026: NumPy buying profile The original article keeps its existing dates and evidence scope; the linked profiles describe their own demonstrations.
The Kingy Brief
Get The Kingy Brief.
AI changes, original tests and one practical thing to try. Fridays at 09:00 Vancouver time.
Free · Double opt-in · Unsubscribe anytime
Sign up for The Kingy Brief on Beehiiv.
Signup help and newsletter schedule
Signup form provided by Beehiiv. After submitting, check your inbox for "Confirm your subscription to The Kingy Brief" and open its confirmation link. Check Spam or Promotions if you cannot find it.
Fridays at 09:00 Vancouver time: source-checked AI changes, original tests and one practical thing to try. We skip a week when there is not enough verified material. Free. Unsubscribe anytime.